
Track Records
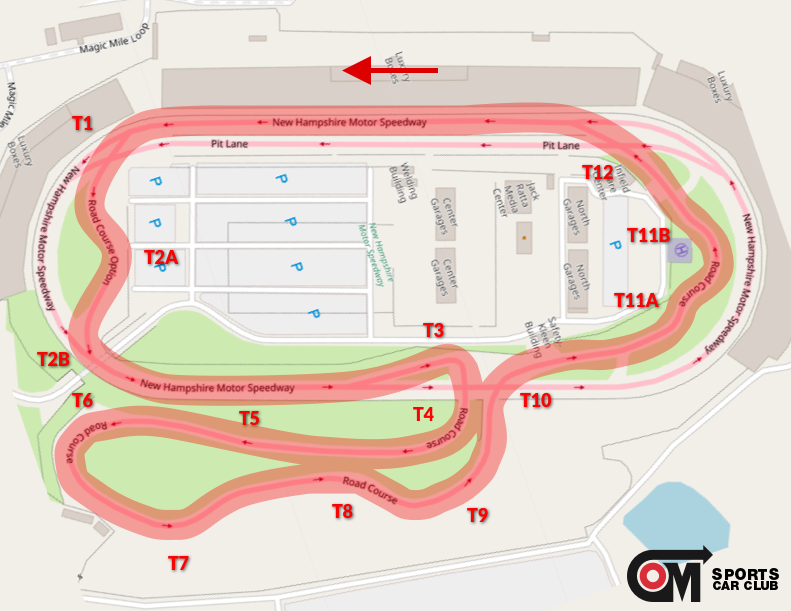
NEW HAMPSHIRE MOTOR SPEEDWAY – Chicane / Chicane Configuration
New Hampshire International Speedway (NHIS) was renamed to New Hampshire Motor Speedway (NHMS) in 2008.
The facility is located in Loudon, New Hampshire, less than an hour north of the New Hampshire/Massachusetts border.
NASCAR events are held each year, NHMS also features a tight, challenging 1.6 mile multi-configuration road course. This course combines some of the oval’s wide banked surface with narrower sections including tight esses, two relatively fast sweepers, several dramatic changes in elevation, and a steeply banked, down-and-up hairpin turn called “the bowl”. At NHMS, you never stop turning!
NHMS’s packed schedule includes a NASCAR Winston Cup race, a NASCAR Busch Grand National North race, several SCCA and vintage events, frequent club events hosted by organizations like COMSCC, Northeast Replica Challenge, and BMW Car Club of America, and numerous motorcycle and kart races.
The NASCAR races are all run on the oval. The SCCA, vintage, and club events use the road course, as do the kart and motorcycle racers.
NHMS also holds several open track sessions throughout the year, typically using the North Chicane/South Oval configuration. These sessions are open to
COMSCC members for a reasonable fee.
NHMS has an official Web site at http://www.nhms.com.
Summary
- Safety first – before proceeding with any pace, identify the location and occupancy of all flagging stations; additionally, scout possible run-off/escape areas and identify potential hazards and risks
- If you’re running the oval, take it easy – those walls are as hard as they look; the oval is challenging even for NASCAR drivers as the pitch and camber changes, there are unsettling bumps in the middle, and you lose grip at exit
- No two corners at NHMS are alike, and most corners at NHMS are unique to the track itself; very steep learning curve
- There is not an obvious “flow” to the course – it is not until each corner/complex is mastered that the semblance of a flow can be enjoyed
- Hit your marks – with how tight/technical the corners are, car placement should receive higher priority compared to at other tracks
- In terms of car placement, 1 inch can matter more at NHMS than 1 foot at other tracks; be precise
- Brutal transitions on/off the oval/outfield; suspension and brakes take a beating; fast laps feel like you’re wailing on the car…because you are
- Choreograph your vision – with many complex sections/corners, each leading into the next, it’s easy to get behind; instead, consciously work your vision through the course to stay ahead
- Tons of available reference points, including visual, auditory, and kinesthetic; take notes and use these as helpful guides to become more consistent or address issues
- This is the type of track where everyone has been, and everyone will say they’ve got it memorized, but no one feels like they actually have it “figured out”
Quick Tips
- T1 is a textbook fast-in/slow-out; focus on bleeding speed as slowly as possible as you trailbrake onto the lower apron of the oval
- T2a immediately follows T1; make sure to line it up by hugging the rainbow curbs at the bottom of T1; get the car slowed – single biggest avoidable mistake on the track is going too fast here
- T2b (chicane/chicane) is all about committing to the apex, even if the car is pointing straight into the wall – use as much track-out as possible to carry speed onto the short straight into T3
- T3 is a mostly a slow-in/fast-out corner, but with extra importance on entry speed because of how hard it is to apply power up the hill; experiment with timing of trail brake/trailing throttle/applying throttle
- T6 “bowl” challenges brake technique with off-camber braking zone; good amount of trail brake needed to induce proper rotation; switching from trail brake to WOT should be very quick and before apex
- T8 is a non-issue in a Miata, but for higher-HP cars the key is to have the wheel straight over the crest; continue turning to the left after T6 and then arc back to the right well before the crest at T8 so you can open your hands over the top of the hill while apexing T8
- T9 is a double apex fast-in/slow-out corner, key here is carrying trail bake as deep as possible, being patient with trailing throttle, and only applying the lightest amount of maintenance throttle to control rotation; be diligent about lining up to the right for T10
- T10 is an off-camber bumpy corner with a nasty apex curb that transitions from the outfield back onto the NASCAR oval; key here is to enter with just a lift, commit to throttle around the apex, and use all the trackout to keep the wheel as straight as possible over bumps
- T11 is as technical as it gets with a tight brake zone + steering input; a trick to corner entry is to just miss the 11a curb on the left while running over the entry curb on the right to produce widest arc and assist with corner entry rotation; make sure to get the car slowed and off the brakes before turn-in
Turn 1
- Safety first: Brake failure? Don’t bother trying to make T1; just cruise through the cones onto the oval where there’s plenty of room to slow down. Any other mid-corner screw-ups – aim outside; straighten the wheel and head for the grass on the right side of the track. The only hard stuff to hit is on the inside.
- Approach T1 from fully track right, save perhaps 1’ to avoid the marbles that build up against the wall; use vision to spot brake markers and corner entry (as well as escape onto oval in case of brake failure)
- Use the numbered boards (4-3-2-1) on the right as reference points for initial turn-in and as a brake marker; between the 2 and 3 boards, angle the car slightly (while still under WOT) towards the outside of the black pavement patch at the beginning of the oval
- Initial turn-in occurs before braking, angling slightly into the corner before applying threshold brake. Most cars can use somewhere between the 1 and the 2 for initial braking.
- Spot the rainbow curbs around to the left and turn-in gradually and under heavy trail brake on an arc to wrap-around those curbs. You shouldn’t get near the cones that block the south oval, instead taking a tighter arc so long as the turn isn’t pinched in a way that binds the suspension – you should never be wider than just outside the black pavement patch.
- Brake release is gradual and starts as the car turns down onto the dark pavement, and fully released just before the flat apron of the oval; idea is to bleed speed as slowly as possible
- As the car reaches the apron of the oval it may bounce or get squirrelly; apply slight maintenance throttle to steady the car, if needed, but in general if you can apply more than just a dab of throttle and keep it on the track, you’ve more than likely overslowed the car on entry. Be ready to apply countersteer in balanced/oversteer-y cars.
- Apex around the rainbow curbs, hugging them while trailing throttle or with slight maintenance throttle, getting as close as possible without hitting them too hard. By now your vision should already be pointing towards 2a/b
- There is no track-out, instead throwing away the exit 100% to setup 2a and subsequently the exit of 2b onto the back straight
Turn 2A
- Safety first: don’t overcook this one; there’s no need to spin here. With that said, aim to the right/outside if anything does happen…until track-out for 2b, in which case be mindful of the wall. Be careful of people pitting-out.
- Approach 2a from as far left as possible, just past the rainbow curbs at the end of T1; look through apex of 2a and to turn-in for 2b
- Usually a quick brake is needed at turn-in; the key is to apply slight brake pressure to transition the weight from right to left while rolling max speed into the corner
- Release the brake fully before the 2a apex curb with the goal of inducing a balanced 4-wheel slip to continue bleeding speed
- Apex 2a just past geometric center on latter part of apex curb; continue arc around the curbing to line up entry for 2b
- As soon as you apex 2a, begin balancing the car to prepare for 2b turn-in; vision should be looking at/through 2b apex
- Apply some throttle to slow rotation and steady the car, and hustle between the apex of 2a and turn-in for 2b
- When transitioning from 2a/2b keep min speed up without sliding towards mid-track
Turn 2B
- Turn-in for 2b from as far to the right as possible, aiming for about 1 car width from the right edge. However, avoid shifting too much weight back-and-forth with exaggerated right wheel input when lining up the entry for 2b.
- 2b should be taken with a quick lift at turn-in. If you can drive at WOT through 2b, you should take a more shallow line through 2a and carry more speed through T1/2a. Experiment with the timing of the lift to induce rotation (earlier lift = less rotation; lift after turn-in = more rotation)
- Apply WOT just after turn-in and well before apex. Lift vision up track towards wall and exit.
- Apex at the temporary yellow curbing just inside the white line and be prepared to open the wheel to counter oversteer over the bumps as the apex crosses over a major seam between the apron and the banked exit of the oval
- Maintain WOT and open the wheel, tracking out 100% to the wall. Aim past the billboards, roughly underneath the caution light.
- If you don’t need to use the entire track, apply throttle earlier and/or turn-in earlier for 2b. However, if you are going to hit the wall, ease up on the throttle as early as possible.
Turn 3-4
- Safety first: Brake failure? Aim for the gap in the the wall to shoot through to T10 – scout this on the out-lap and practice lining it up at least once. There’s plenty of pavement to catch mistakes, but don’t get greedy trying to save it or you could end-up in one of the many stacks of tires or walls that surround the corner. While exiting to T4, be careful not to induce throttle-on oversteer, and be prepared to lock-up early if you screw it up (or you could end up sliding down the hill to a nasty wreck on the outside of the oval wall). If understeering at exit/running out of track at T4, keep wheel straight and gently guide car back on-track.
- Approach T3 by continuing the arc from the track-out of 2b, all the way from the wall at track-out towards the left-side of the track; goal is to line-up a perfectly straight brake zone into T3
- Cones on the left are actually decent brake markers (usually in the same spot), but a better mark is the yellow line and kink in the track at the beginning of the brake zone. Spot the apex and survey the corner upon approach, and then quickly reach threshold brake at the chosen reference point (usually in terms of car lengths before or after the white line/kink); brake zone is bumpy so sometimes max brake pressure will cause lock-up/excess ABS…90% pressure recommended
- Approaching the final cones on the left, look through apex and “bend” vision into the corner; turn-in should be with trail brake and just past the 2nd to last cone. Another visual cue for turn-in is the start of the black tire wall on the left.
- Release the brake fully as soon as the angle to the apex has been established; release smoothly as not to upset the car
- Arc the car either towards the outside of the “rumbles” at the apex or T3, or for the fastest entry aim just off the tire wall that is fully inside the “rumbles”; find the arc you plan to take up the hill (T4) with your vision
- Open the wheel over the bumpy apex (the rumbles are bumpy, and the track surface inside the rumbles are bumpy too) to counter sliding; momentum cars should already be at WOT here, just about everything else should pause and ease onto the throttle after the rumbles; look up the hill
- Mid-corner usually requires a pause in pedal inputs – let the car “coast” for a second and then apply WOT. Eliminate maintenance throttle – trail brake on the way in, coast over the bumpy apex, and then apply throttle once up the hill
- Use the hill to control rotation – experiment with wheel/pedal inputs and pay attention to how the hill induces/reduces rotation based on various inputs. Find the exit with your vision.
- Line from mid-corner to exit is not important, so long as enough speed is carried to take the car all the way to track-out; focus on applying clean power with minimal wheel slip
- Track out all the way to the white line on the left at T4 (or past it)
Turn 6/7
- Safety first: Brake failure? This is a bad spot for a brake failure – angle towards the apex to maximize time on the asphalt before flying off the track. Do your best to scrub speed/induce a slide in case of utter failure. It’s rare to see someone screw-up an entry and just drive-off, but the potential is there – be mindful of placement of right tires. Most screw-ups are at exit, following an early exit and going off the track. Luckily, this is an easy corner to lift off the throttle after the apex instead of blindly driving off the track – keep in mind the extra pavement to the right at exit is off-camber and will not save you.
- Approach T6 from fully track-right; sometimes this can feel uncomfortable as approach is steeply down-hill and arcs slightly; spot the apex, but return your vision to the brake zone
- Brake in a straight line from the right edge of the track, in a straight line, to the turn-in point which is 100% track-right. Because the entry arcs slightly, the straight line brake zone will cut through the arc of the corner slightly. Once on the brake, look into the corner and visualize the arc from turn-in to apex.
- Turn-in is all about enabling the correct amount of weight transfer to the front right tire, which requires strong trail brake that is quickly released in order to not overload the front right; turn-in point is about 1 car length past the beginning of the extra run-off pavement (off-camber – don’t both using this), and should be executed sharply – if turn-in feels imprecise, likely turning in too early/too slowly
- Release the brake fully as soon as the front right tire bites into the corner and the car is arcing towards the apex; by now spot the exit
- The track picks up a ton of favorable camber so immediately return to throttle, often WOT instantly, as soon as the apex arc is established.
- Hold WOT through the apex, coming as close as possible to the apex curb without hitting it.
- Car will be on the limit under WOT all the way through track-out, likely using some (not all, usually no more than 50%) of the extra off-camber pavement on the right. If it can’t stick with WOT, apex later and apply more trail brake. If you don’t need any of the excess pavement, apex earlier and release brake earlier.
- Hold steering input past the exit of turn 6 and arc into the apex of turn 7
- In low HP cars, begin unwinding the wheel to transition towards turn 8; in high HP cars, hold steering input to continue around turn 7 apex and towards the left half of the track before transitioning steering towards turn 8
Turn 8/9
- Safety first: Brake failure? Go straight. There’s a big field where your car can come to a stop slowly, but if you go off sideways there’s a bigger risk of a rollover. All other mistakes? Correct them early – there’s plenty of pavement at entry, but things get hairier the deeper into the corner you get. Don’t drop a wheel at apex.
- Approach T8 by continuing the arc from the exit of T6 (left steering input) through T7, and past T7 to line-up ~mid-track before finally turning to the right to line up T8; vision should find arc from T7 to crest of hill at T8
- There is no brake zone for T8 – do not touch the brakes before you crest the hill; all braking is done for T9 and begins, at the earliest, just past the crest of T8
- Turn-in for T8 in a smooth arc, aiming towards the apex at the crest of the hill (where the old “treehouse” used to be); spot apex
- After turn-in, wheel input should be reduced as the apex is approached; by the time the car is cresting the hill, wheel should be straight; apex 100% track right, but don’t drop a wheel. As soon as hill is crested, aim vision towards apex of T9 on back side of hill.
- Hug the apex as far to the right as you can – the goal is to create as wide of an arc as possible into Turn 9
- Most cars can maintain WOT through this section, but if a lift is required, make it as light, smooth, and short as possible.
- Want to spin out? The fastest way to do this is to hold WOT out of T6, don’t continue the arc past T7 and instead aim straight for the T8 apex, quickly run out of room and traction, crank the wheel at the crest of the hill, and lift/hit the brake when the car gets light.
- When approaching T9, angle brake zone in a straight line from T8 apex to T9 1st apex curbs. T9 is best taken as a double apex so braking will continue to be trailed past the first apex and angle the car down the hill towards the 2nd apex at the end of T9 (tire wall on left).
- Apply brakes firmly at first, but quickly bleed off pressure to allow maximum lateral grip through T9; hold the trail brake for the first half of the corner. Data should show a gradual reduction of speed all the way around T9.
- Induce moderate slip with trail brake when entering T9 and let the car drift ~⅓ track width from the left side of the track around mid-corner. Wrap vision around corner to spot 2nd apex/T10 turn-in.
- Quickly gain composure of the car when approaching 2nd apex (use a little bit of maintenance throttle), and line up Turn 10 from 100% track left with car balanced and composed to turn-in quickly to the right. Look through T10 apex.
Turn 10
- Safety first: Don’t slam into the apex curb or you’ll ruin your car. Bottom 1-2” of the curb are fine in cars without front splitters, but there’s no room for error. Most crashes start with a messy entry/loss of control before apex. The rear will step out if you’re actually at the limit so be ready to catch it immediately. If you can get some control of the car, you can go off to the outside onto the grass, often with minimal damage.
- Approach from 2nd apex/exit of T9, 100% track-left along the tire wall
- There is no braking, but coordinating the lift for T10 is important. Weight should shift gradually from ~neutral while under maintenance throttle at end of T9 towards front tires at turn-in. Quicker/sharper and later lift for more rotation.
- Just after turn-in there is a seam in the track at the large apex curb where the outfield meets the oval; be prepared for the car to get upset (whether over/understeer is exacerbated depends on setup and amount of rotation induced at turn-in); even with bumps, vision should be up and aiming through apex and towards track-out
- Apex at the curb – do not miss by more than 6”; begin applying throttle while passing apex, quickly getting to WOT to fully settle rear end before next bump/transition in track surface
- Track-out over another transition, being prepared to catch the car, and continue 100% track-left, using every ounce of track + extra couple inches of pavement beyond while line
Turn 11 / 12
- Safety first: Looks safer than it is. If you overcook it – go off straight and early. Just head towards the North Oval and live to drive another day. If you’re already committed to turn-in, it’s still better to try to go off wide, even though you’ll risk breaking something with all the bumps and such. Anything is better than over rotating towards the inside and having the slide carry you into the pit wall – this has happened more than once and has the potential to cause catastrophic damage to car/driver.
- Approach from the exit of T10, 100% track left; continue right wheel input to arc car towards the middle of the track (~67% track-left), and then begin angling back to the left to line up 11a/b
- Lining up the entry to 11a is tricky – curbs on the left are followed by curbs on the right; just miss the curbs on the left, and angle a mostly straight line brake zone towards the turn-in curb on the right; don’t bother swinging way right (little-to-nothing is gained, and a lot is lost with excess weight transfer)
- A helpful set of reference points is the 11a curbing on the left plus the 11b curbing on the right; continue arcing towards the right until you can see a path open between these 2 curbs, and then head straight for it
- Brake zone for 11a is going to begin with slight wheel input (accordingly, only apply ~80% max pressure on brake pedal), but should be aggressive to slow the car down for T11b which is slower than the previous several corners. Braking should begin 1-2 car lengths before the curb on the left (earlier than you’d think). Survey arc to apex as soon as you begin braking.
- Brake release should begin before the turn-in curb and should be finished as the car runs over the turn-in curb fully (mow all of it down – all the way to the dirt/grass)
- Turn-in should happen sort of automatically, induced by the rotation caused by running over the turn-in curb on the right with slight wheel input; barely any trail brake is needed; look through the apex
- Angle the car towards the outside of the large black pavement patch at mid-corner and continue the arc towards the apex
- Get as close to possible to the apex curb without hitting it – apply WOT as early as possible with minimal wheel slip; eyes to track-out curbing
- FYI – this corner typically makes cars understeer at first, and then will switch to snap-oversteer as the diver overcompensates with more wheel input
- Track-out fully, using all the rainbow exit curbs without dropping a wheel (and causing damage) at exit
- Take a smooth arc through T12 and onto the front straight
Credit: Nick Fontana